


Switch Panel Purelux Multi-switch Dashboard Controller, 10-30V
195,99 €
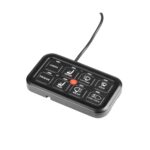
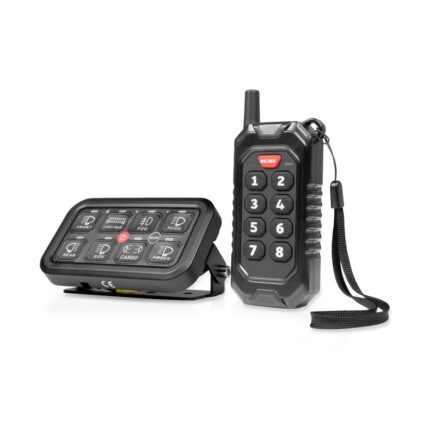
The Purelux Multi-Switch Dashboard Controller is a very versatile and convenient switch panel for controlling up to eight different electrical devices (lights, beacons, engine fan or even a seat heater). With the help of the switch panel, for example, the front, rear and side work lights and the beacon can be controlled separately in the work machine, and the switches for all lights are conveniently in the same place. The lights can be turned on and off individually, and with the switch in the middle, all devices installed behind the panel can be turned off at the same time. All lights connected to the switch panel (and other devices as well) can be turned on either steadily (i.e. turn the button on and off with another click), momentarily (the light turns on when the button is held down) or flashing.
The switch panel has an RGB backlight that automatically adjusts to the brightness of the environment, the color of which can be selected to please the eye. The backlight can also be turned off by pressing the “Mode” switch once. A total of 45 different picture stickers and five black, self-cutting stickers for marking the switches are included. In this way, the switch intended for each different device or light can be marked to prevent confusion. Thanks to the backlight, the symbol on the switch shines clearly even in the dark.
From the switch panel, all the lights connected behind it can be made to light either steadily, momentarily (by pressing the button at the bottom) or flashing. The function can be changed by quickly pressing the Mode button in the middle of the panel twice, after which the led indicators above the switch start flashing. After that, press the switch whose function you want to change. This way, for example, a separate flasher relay is not needed to make the lights flash! In addition, the panel is equipped with a convenient memory function, i.e. it turns on the lights in the same mode that was used before turning off the power.
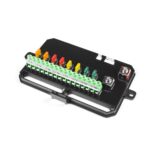
NOTE! The current rating of the switch panel is 600W @12V and 1200W @24V. The power of electrical devices that are on at the same time may therefore be a total of 600W (or 1200W). Circuits 1 and 2 can withstand a maximum current of 30A, circuits 3 and 4 a current of 20A, circuits 5 and 6 a current of 10A and circuits 7 and 8 a current of 5A. Each circuit has its own fuses in the control box.
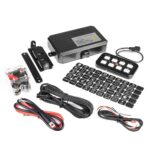
Delivery content
- Switch panel (8 switches)
- Fuse box
- Residual current protection (60A)
- 4-pole cable
- 2-pole cable
- Power cable
- 2 different fixing irons for the switch panel
- Fuse box fixing iron
- 50 labeling stickers for labeling buttons
- Screw set
- Ties
- Manual
Technical information
- What: Switch panel Purelux Multi-Switch Dashboard Controller, 10-30V
- Purpose: operating up to 8 electrical devices from the same switch panel
- Enables e.g. additional lights, side and rear work lights and the beacon panel to be used separately
- Operating voltage: 10-30 V
- Power rating: 600W @12V, 1200W @24V
- Maximum current: 60 A
- Includes 50 marking stickers
- Switch panel size: 116 x 66 x 14 mm (W x H x D)
- IP rating: IP65
- Operating temperature: -40 to +105°C
- Approvals: CE marked
- Change: Memory function in the panel
- Warranty: 12 months
Connection instructions
Power: Connect the main power cable (Red) from the vehicle’s battery or other fixed power point to the residual current device, and from the residual current device to the fuse box to the attachment point marked in red. Connect one end of the grounding cable (Black) to e.g. the vehicle frame or other fixed grounding point, and the other end to the grounding point marked in black in the fuse box.
Connecting the switch panel: Connect one end of the supplied 4-pin cable to the switch panel and the other end to the marked plug in the fuse box.
Excitation current: The fuse box can be supplied with excitation current according to the desired use: if you do not want the devices installed behind the switch to work without the vehicle running, it is recommended to connect the excitation current cable to, for example, a cigarette lighter or the bottom of the ignition switch. If, on the other hand, it is desired that the devices connected to the panel can be used even when the vehicle is turned off, it is recommended to connect the excitation current directly to, for example, the positive pole of the car battery or to another fixed power point. Connect the 2-pole plug of the excitation power cable to the fuse box.
Note! The red LED indicator next to the fuse indicates if the fuse has blown.
Connecting lights (or other electrical devices): Connect the desired lights to outputs 1-8 found in the fuse box. Note the maximum possible current of each circuit, and connect the device to be connected to a suitably powerful current output.
Valostore’s tip: If the power of the lights exceeds the maximum power of the controller (600W @12V, 1200W @24V), the controller can also be used to control the relay, in which case the current needed by the lights (or part of the lights) passes through the relay/relay wiring harness, and only the signal current comes from the controller. In this case, instead of the power cord of the light, only the excitation wire of the relay/relay wiring harness is connected to the output from the controller.
In this way lights are connected behind their own relay wiring harness. In this case, the current of the lights passes through the relay, and these do not require power from the controller.
Additional features of the switch panel – in addition to continuous power, the switches can be programmed to work as a one-time flash button or a continuous flashing strobe function: To change the operating mode, follow these instructions: Step 1: Turn on the switch panel. Step 2: Press the “Mode” button twice quickly and the LED indicators above the switches will start flashing. Step 3: Press the switch whose function you want to change. Step 4: Test the operation. If the operating mode did not change, restart the switch panel and repeat steps 1-3.


Reviews
There are no reviews yet.